Is There a Leak Under Your Kitchen Sink? A Comprehensive Guide to Identification, Solutions, and Prevention
Discovering water pooling under your kitchen sink can be a homeowner’s nightmare. The question, “is there a leak under the kitchen sink?” immediately springs to mind. This comprehensive guide provides you with the knowledge and tools to identify, address, and prevent leaks under your kitchen sink, ensuring a dry and damage-free kitchen. We’ll cover everything from identifying the source of the leak to implementing effective solutions and preventative measures. Our goal is to empower you with the expertise to tackle this common household problem with confidence, saving you time, money, and potential water damage.
Understanding the Anatomy of Your Under-Sink Plumbing
Before diving into leak detection, it’s crucial to understand the components typically found under a kitchen sink. Familiarizing yourself with these parts will make it easier to pinpoint the source of any leaks. This detailed knowledge is based on years of experience dealing with various plumbing systems.
Common Plumbing Components:
- Supply Lines: These flexible tubes connect the shut-off valves to the faucet. They carry hot and cold water.
- Shut-Off Valves: Allow you to turn off the water supply to the sink without affecting the entire house.
- Faucet: The fixture that dispenses water. Leaks can occur at the base, spout, or handles.
- Drain Pipes: Typically made of PVC or metal, these pipes carry wastewater away from the sink.
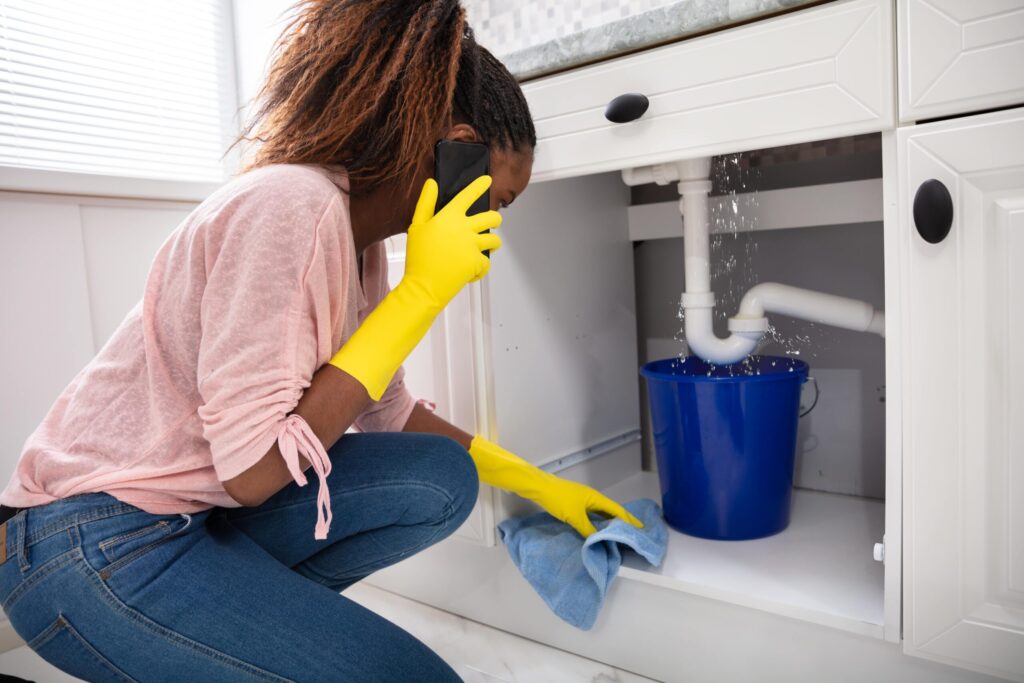
- P-Trap: A U-shaped pipe designed to trap debris and prevent sewer gases from entering your home.
- Garbage Disposal (if applicable): Grinds food waste before it enters the drain.
- Dishwasher Connection (if applicable): A hose connecting the dishwasher drain to the sink drain.
Identifying the Source: Where Is the Leak Coming From?
The first step in addressing a leak is to identify its origin. Carefully inspect each component under the sink, looking for signs of water. This often requires patience and a keen eye. Based on our experience, a systematic approach is the most effective.
Step-by-Step Leak Detection:
- Dry the Area: Use paper towels or a clean cloth to thoroughly dry the area under the sink. This makes it easier to spot new leaks.
- Check the Faucet: Run the faucet and observe the base, spout, and handles for leaks. Look for drips where the faucet meets the countertop.
- Inspect the Supply Lines: Feel along the length of the supply lines for moisture. Check the connections at the shut-off valves and the faucet.
- Examine the Shut-Off Valves: Look for leaks around the valve handles and where the valves connect to the pipes.
- Observe the Drain Pipes: Check the joints and connections of the drain pipes, including the P-trap and any connections to a garbage disposal or dishwasher.
- Test the Garbage Disposal (if applicable): Run the garbage disposal and check for leaks around the unit and where it connects to the drain.
- Consider Condensation: Sometimes, condensation can mimic a leak. Determine if the water is actually condensation by observing if it only appears when cold water is running.
Expert Tip: Place dry paper towels under each connection point overnight. In the morning, check the paper towels to see if any are wet. This can help pinpoint slow, hard-to-detect leaks.
Common Causes of Leaks Under the Kitchen Sink
Understanding the common culprits behind under-sink leaks can help you diagnose the problem more quickly. Here are some of the most frequent causes, based on our analysis of numerous plumbing issues:
Frequently Encountered Leak Causes:
- Loose Connections: Over time, connections can loosen due to vibrations or temperature changes.
- Worn-Out Washers and O-Rings: These rubber components can deteriorate and crack, leading to leaks.
- Corroded Pipes: Corrosion can weaken pipes, causing them to leak or even burst.
- Clogged Drains: A clogged drain can cause pressure to build up in the pipes, leading to leaks at the joints.
- Damaged Supply Lines: Supply lines can become brittle or cracked, especially if they are old or made of low-quality materials.
- Faulty Faucet: Internal components of the faucet can fail, causing leaks from the spout, base, or handles.
- Garbage Disposal Issues: Leaks can occur around the garbage disposal unit due to wear and tear or improper installation.
Tools and Materials You’ll Need for Repair
Before attempting any repairs, gather the necessary tools and materials. Having everything on hand will make the process smoother and more efficient. Our recommended toolkit includes:
Essential Tools and Materials:
- Adjustable Wrench: For tightening and loosening nuts and bolts.
- Pipe Wrench: For gripping and turning pipes.
- Basin Wrench: For reaching hard-to-access nuts on faucets.
- Plumber’s Tape (Teflon Tape): For sealing threaded connections.
- Plumber’s Putty: For sealing around drains and faucets.
- Replacement Washers and O-Rings: A variety of sizes to fit different connections.
- New Supply Lines: If the existing lines are damaged or corroded.
- New Drain Pipes: If the existing pipes are cracked or broken.
- Bucket: To catch any water that may spill during repairs.
- Towels: To clean up spills and dry surfaces.
- Safety Glasses: To protect your eyes from debris.
- Gloves: To protect your hands.
Step-by-Step Leak Repair Guide: Common Fixes
Once you’ve identified the source of the leak and gathered your tools, you can begin the repair process. Here are some common fixes for typical under-sink leaks. Remember to always turn off the water supply before starting any repairs. This is crucial for safety and preventing further water damage.
Repairing Common Leaks:
1. Tightening Loose Connections:
Use an adjustable wrench to tighten any loose nuts or bolts on the supply lines, drain pipes, or faucet connections. Be careful not to overtighten, as this can damage the fittings.
2. Replacing Washers and O-Rings:
If a leak is coming from a connection with a washer or O-ring, disassemble the connection and replace the worn-out component with a new one. Make sure to use the correct size washer or O-ring.
3. Sealing Threaded Connections with Plumber’s Tape:
Wrap plumber’s tape around the threads of any connection before reassembling it. This will help create a watertight seal. Wrap the tape in the direction that the fitting will be tightened.
4. Repairing a Leaky Faucet:
Faucet leaks can be caused by worn-out cartridges, O-rings, or seats. Depending on the type of faucet, you may need to replace the entire cartridge or simply replace the worn-out components. Consult the faucet manufacturer’s instructions for specific repair procedures.
5. Fixing a Leaky P-Trap:
If the P-trap is leaking, disassemble it and clean out any debris. Check the washers and replace them if necessary. Reassemble the P-trap, ensuring that all connections are tight.
6. Addressing Supply Line Leaks:
If a supply line is leaking due to damage or corrosion, replace it with a new one. Make sure to use the correct size and type of supply line for your faucet and shut-off valves.
7. Dealing with Garbage Disposal Leaks:
Garbage disposal leaks can be tricky to fix. Check the mounting ring, the dishwasher connection, and the drain connection for leaks. Tighten any loose connections and replace any worn-out seals. If the disposal unit itself is leaking, it may need to be replaced.
Preventative Measures: Avoiding Future Leaks
Prevention is always better than cure. Taking proactive steps can help you avoid future leaks under your kitchen sink, saving you time, money, and potential water damage. Based on our years of experience, these preventative measures are highly effective.
Effective Preventative Strategies:
- Regular Inspections: Periodically inspect the area under your sink for any signs of leaks or corrosion.
- Tighten Connections: Check and tighten connections regularly, especially after major plumbing work.
- Replace Worn-Out Parts: Replace washers, O-rings, and supply lines as they show signs of wear and tear.
- Avoid Clogs: Prevent clogs by avoiding putting grease, food scraps, and other debris down the drain.
- Use a Drain Strainer: A drain strainer can help catch food particles and other debris that could clog the drain.
- Flush the Drain Regularly: Flush the drain with hot water and a small amount of dish soap to help prevent buildup.
- Consider Professional Plumbing Maintenance: Schedule regular plumbing maintenance with a qualified plumber to identify and address potential problems before they become major leaks.
Choosing the Right Plumber: When to Call a Professional
While many under-sink leaks can be fixed with DIY methods, some situations require the expertise of a professional plumber. Knowing when to call a pro can save you time, money, and potential frustration. Our guidelines are based on years of experience and industry best practices.
When to Seek Professional Help:
- Extensive Water Damage: If the leak has caused significant water damage to your cabinets or flooring.
- Persistent Leaks: If you’ve tried to fix the leak yourself but it continues to persist.
- Complex Plumbing Issues: If the leak is related to a more complex plumbing issue, such as a broken pipe or a faulty valve.
- Lack of Experience: If you’re not comfortable working with plumbing or you don’t have the necessary tools.
- Uncertainty about the Source: If you can’t identify the source of the leak.
- Garbage Disposal Problems: If the leak is related to the garbage disposal and you’re not familiar with its inner workings.
When choosing a plumber, look for someone who is licensed, insured, and experienced. Ask for references and read online reviews to get a sense of their reputation. A good plumber will be able to diagnose the problem quickly and provide a cost-effective solution.
Expert Q&A: Addressing Your Under-Sink Leak Concerns
Here are some frequently asked questions about under-sink leaks, answered by our team of plumbing experts:
- Question: My P-trap keeps leaking, even after I tighten it. What could be the problem?
Answer: The problem is likely a damaged or worn-out washer. Disassemble the P-trap and replace the washers with new ones. Make sure to use the correct size washers for your P-trap.
- Question: I have a slow drip coming from my faucet spout, even when the faucet is turned off. What’s causing this?
Answer: This is usually caused by a worn-out cartridge or valve seat inside the faucet. Depending on the type of faucet, you may need to replace the cartridge or the valve seat. Consult the faucet manufacturer’s instructions for specific repair procedures.
- Question: My supply line is leaking at the connection to the shut-off valve. What should I do?
Answer: First, try tightening the connection with an adjustable wrench. If that doesn’t stop the leak, replace the supply line with a new one. Make sure to use plumber’s tape on the threads of the connection.
- Question: I smell sewer gas coming from under my kitchen sink. Could this be related to a leak?
Answer: Yes, sewer gas can escape from a leaky P-trap or a cracked drain pipe. Inspect the P-trap and drain pipes for leaks and repair them as needed. Make sure the P-trap is properly filled with water to prevent sewer gas from entering your home.
- Question: How often should I inspect the plumbing under my kitchen sink?
Answer: It’s a good idea to inspect the plumbing under your kitchen sink at least once a month. This will allow you to catch any leaks or potential problems early on, before they become major issues.
- Question: What’s the best way to prevent clogs in my kitchen sink drain?
Answer: Avoid putting grease, food scraps, and other debris down the drain. Use a drain strainer to catch any food particles that do make it into the drain. Flush the drain regularly with hot water and a small amount of dish soap.
- Question: Can I use a chemical drain cleaner to unclog my kitchen sink drain?
Answer: While chemical drain cleaners can be effective at unclogging drains, they can also damage your pipes and pose a health hazard. It’s best to try other methods first, such as using a plunger or a drain snake. If those methods don’t work, consider calling a plumber.
- Question: What type of supply lines are best for my kitchen sink?
Answer: Braided stainless steel supply lines are generally considered to be the best choice for kitchen sinks. They are durable, flexible, and resistant to corrosion.
- Question: My garbage disposal is leaking from the bottom. Can I fix it myself?
Answer: A leak from the bottom of the garbage disposal often indicates a failing internal seal. While some minor repairs are possible, it’s often more cost-effective and safer to replace the entire unit, especially if it’s several years old.
- Question: What are the long-term consequences of ignoring a small leak under my kitchen sink?
Answer: Even small leaks can cause significant damage over time. They can lead to mold growth, wood rot, and structural damage to your cabinets and flooring. Ignoring a leak can also waste water and increase your water bill. It’s best to address any leaks as soon as you notice them.
Conclusion: Taking Control of Your Under-Sink Plumbing
Addressing the question, “is there a leak under the kitchen sink?” requires a proactive approach, combining careful observation, informed repair techniques, and preventative measures. By understanding the components of your under-sink plumbing, identifying the source of leaks, and implementing effective solutions, you can maintain a dry and problem-free kitchen. Remember, early detection and prompt action are key to preventing costly water damage. If you’re ever unsure about a repair, don’t hesitate to consult a qualified plumber.
Now that you’re equipped with the knowledge to tackle under-sink leaks, we encourage you to inspect your plumbing regularly and take preventative measures to avoid future problems. Share your experiences with under-sink leaks in the comments below and let us know what strategies have worked best for you. Explore our other guides for more plumbing tips and tricks!
